Syncing Lists: Customers, Vendors, Employees, Classes, and Service Items
The first time you connect your Aero account to your QuickBooks Online account, Aero imports all of your QuickBooks Customers (Customers listed in QBO Your Books, not Clients in QuickBooks Online Accountant), Vendors, Employees, Classes, and Service Items*. The customers will be listed under Customer > Companies and the vendors, employees, classes, and service items are used as references to make sure that time entries are properly classified in QuickBooks. During the first sync, contact information in your QuickBooks customer list will be used to create your contact list. After the initial sync, if you want to pull information from QuickBooks, you can choose to sync your accounts manually, by going to Account Settings > Integrations and then clicking the blue Sync QuickBooks Now button.
Customers
Customers are synced both ways:
- If you add a new customer in Aero it will be exported to your QuickBooks account automatically.
- If you add a new customer in QuickBooks, it will be imported to Aero on the next sync. Note: the name you choose as the display name in QuickBooks will be exported to Aero as the Company Name. The name you put in the Company Name field in Aero will be exported to the Company name field in QuickBooks.
- If you mark a customer as 'Inactive' in Aero, the customer will be marked as inactive in QuickBooks Online as well.
- However, if you mark a customer as inactive in QuickBooks Online, the customer is then 'hidden' from Aero and so will not be updated to 'inactive' in Aero automatically.
Contacts
If you add contact information to a new customer in QuickBooks, a new contact will be created in Aero based on that information. If you add contact information to a new customer in Aero, the contact name and email will not be exported to QuickBooks with the customer information.
Other companies and lists
You can add companies in Aero that are not customers: Vendors, Employees, Leads, Owner, or Other. Any company that is one of these types (i.e., any company that is not a customer) will not be exported to QuickBooks. If you make changes in QuickBooks to Vendors, Employees, Classes, or Service Items, the changes will be reflected in Aero the next time you sync.
Syncing Time
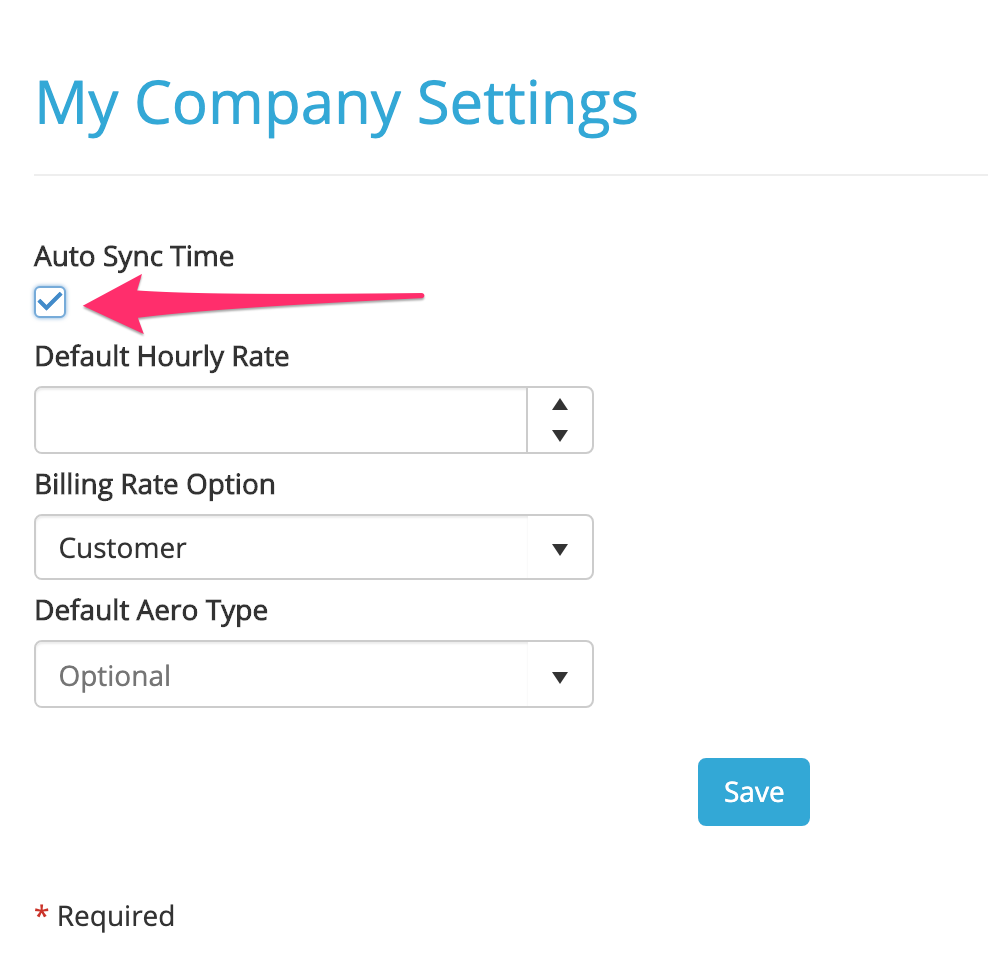
When an Aero user either Saves & Completes an Aero or Saves & Defers one, a time entry is logged. If you have set up your company so that time automatically syncs to QuickBooks, the time entry will be sent to QuickBooks at the same time it is saved in Aero. (Aero Settings > General Settings, check Auto Sync Time).
The information that is sent to QuickBooks with a single time entry is:
- the time (as a fraction)
- the time notes
- the user’s QuickBooks entity
- the QuickBooks Service Item for the entry
- the customer
- the QuickBooks Class
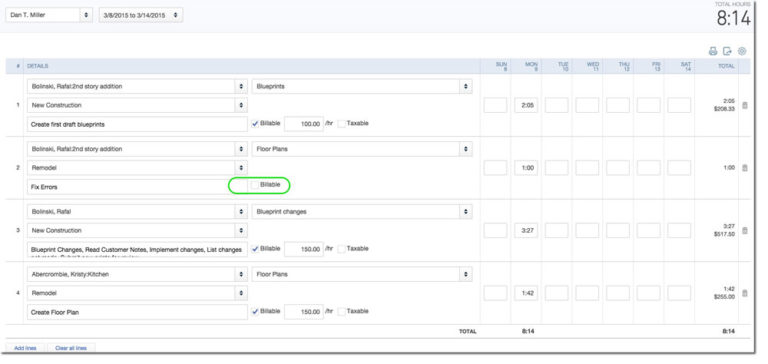
- whether it was marked as billable
- and the date
Time entries that have been marked as billable will be available to be added to customer invoices. You can edit time entries as you add them to invoices to round to the nearest hour or change the billing rate. If you edit a time entry in QuickBooks Online, the changes will not be synced to Aero.
Time entries that have been marked as Fixed Fee or neither Fixed Fee nor Billable will not be available to be added to a customer invoice. If you have checked Auto-Sync Time, all time entries (billable and not billable) will be exported to the appropriate employee’s timesheet and will appear on time-related reports in QBO.
If you have not checked Auto-Sync Time on the Manage > My Company page, but you want to have a particular time entry sync to your QuickBooks file, you can do that. You can approve multiple time entries at the same time using Batch Update Times. Clicking the Sync QuickBooks Now button does not sync time to QBO. To change a single time entry:
- Find the time entry you want to sync in the Manage > Time grid.
- Click the blue Time button on the left of the time entry.
- The Edit Time screen will open: Uncheck the Do Not Sync button.
- Click the Save & Close button. The time entry will be exported to QuickBooks.

Comments
0 comments
Please sign in to leave a comment.