The Google Workspace integration is being depreciated and will no longer be supported as of June 30, 2023. The Office 365 integration remains unchanged.
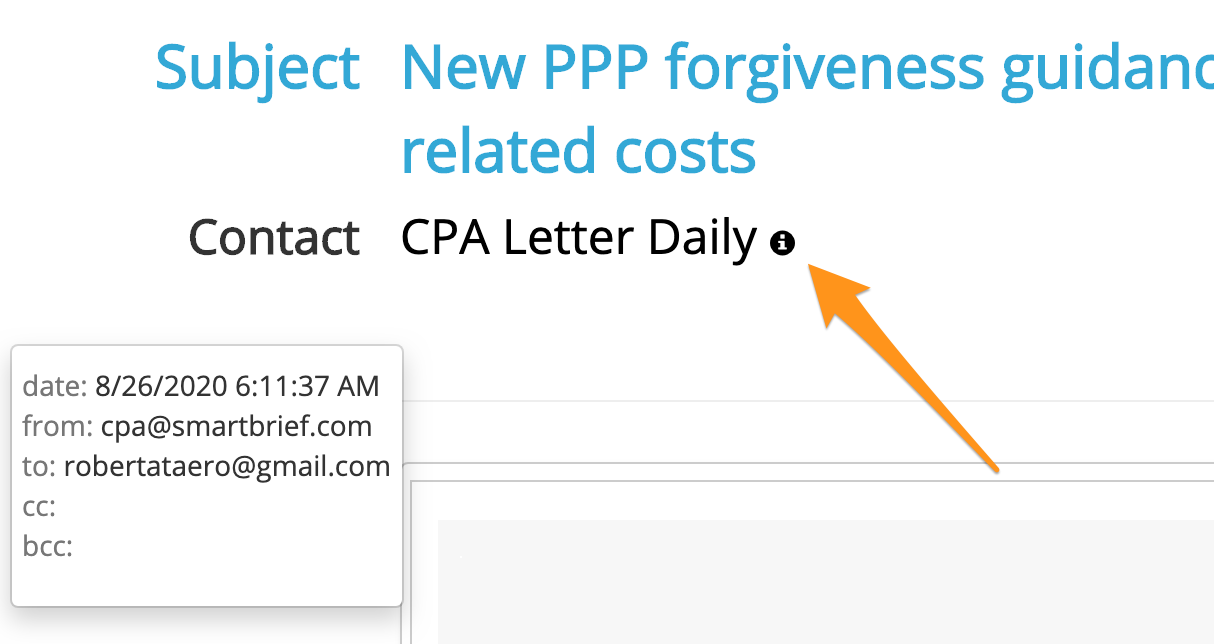
To read an email simply click on the envelope icon shown on the My Aeros screen or the My Dashboard screen. The Read Email window will open with the subject of the email in blue at the top and the name of the contact that sent the email below that.

Click the "i" to see more information about the incoming email. An information box will pop up with the date the email was sent, the from email, the to email(s), and the cc email(s).
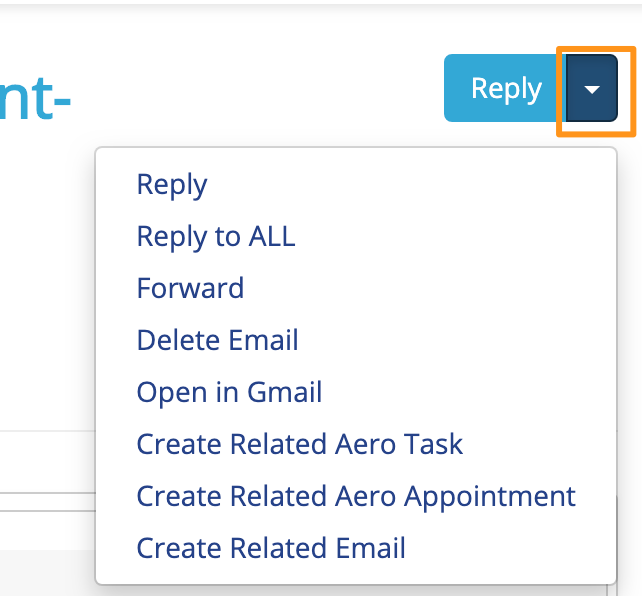 Click the Reply button to reply to the sender.
The dropdown menu on the reply button has several choices:
- Reply - Reply only to the sender of the email.
- Reply to ALL - Reply to everyone who received the original email.
- Forward - Forward the email to someone who didn't receive the original.
- Delete Email - Delete the email from Aero. Once an email is imported into Aero, you can delete it in Office 365/Gmail without affecting the copy in Aero. You can likewise delete an email in Aero without affecting the copy in Office 365/Gmail.
- Open in Gmail - open and view this email in Gmail. This is how you can view attachments. Only available if your Aero account is syncing with G-Suite.
- Create related Aero Task - Create a new Aero task that will autofill with information from this email. The task will also have a Related Aero tab where users will be able to see the email.
- Create Related Aero Appointment - Create a new Aero appointment that will autofill with information from this email. The appointment will also have a Related Aero tab where users will be able to see the email.
- Create Related Email - Create a new email that will autofill with information from this email. The new email will also have a Related Aero tab where users will be able to see the original email.
If there is an attachment, you will see the name of the attachment below the body. You need to open the email in Office 365 to see the attachment.

Below the body of the email, you will see some Aero information. Some of the fields will be auto-filled with the choices you made in My Preferences. Some will be auto-filled based on the sender's email address. You can make changes as needed.

- Type - The Aero Type assigned to the email
- Company - The client or other company the email should be associated with.
- Aero Group - The Aero Group the email should be associated with.
- Hat - the Hat for this email.
- Billable - whether or not this email should be marked as hourly billable.
- Time Note - the notes that will be associated with the current time entry. Auto-fills with "Read Email" and the subject of the email.
- Add Comment - add an internal comment to the email. This comment will only be seen by other team members.
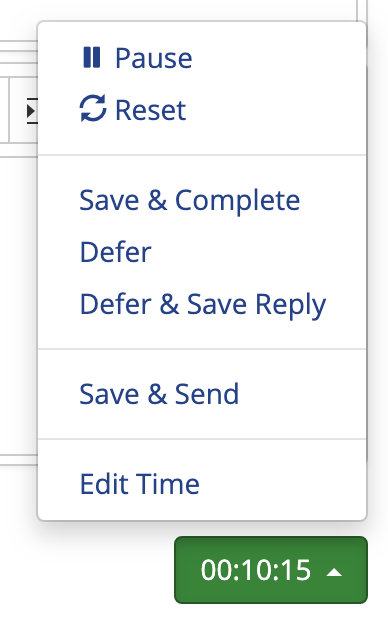 At the bottom of the screen, you will see the green timer button, automatically tracking time associated with writing the email. When you are done, click the timer button to see your options.
- Pause - Pause the timer.
- Reset - Reset the timer to 00:00:00
- Save & Complete - Save the email, change the status to "Completed", and save your time without replying to the email.
- Defer - Save the email, save your time, change the status to "Deferred". If you have started writing a reply it will not be saved.
- Defer & Save Draft - Save the email as a draft and defer it to your list. The draft will appear on your Aero list as an orange envelope.
- Save & Send - Save the email you've written, mark it as complete, and send it.
- Edit Time - Edit the timer.
Comments
0 comments
Please sign in to leave a comment.